Bose Wave Radio Troubleshooting
Your Bose Wave Radio just went silent, won't power up, or keeps spitting out CDs. Bose Wave Radio Troubleshooting doesn't have to begin with a $150 service bill. Most common failures have known causes and documented fixes.
The trick is matching your symptom to the right repair path.
That is the approach here. In our research, the most frequently reported failure point across all Wave Radio generations is the internal power supply board, particularly the electrolytic capacitors. Aggregate repair records suggest capacitor failure causes roughly 60-70% of dead unit cases in radios over 10 years old.
As of 2026, replacement capacitor kits remain widely available for under $20. Start by identifying your symptom below and you will know exactly which part to investigate.
Image source: Bing (Web (fair-use with source credit))
Quick Symptom Check – Where to Start
Every fix starts with a clear symptom. The table below maps what you are seeing to the most likely culprit and the guide section that walks you through the repair.
| Symptom | Most Likely Cause | Jump To |
|---|---|---|
| No lights, no display, completely dead | Power supply board, fuse, or AC cord | No Power |
| Display works, but no sound from speakers | Speaker drivers, amplifier stage, or remote/mute | No Sound |
| CD won't play, skips, or grinds | Dirty laser lens or stuck sled rail | CD Problems |
| Clock resets every time you unplug | Internal CR2032 battery is dead | Clock Resets |
| Static, hiss, or weak FM/AM reception | Antenna wire or grounding issue | Static, Hum, or Poor Reception |
| Loud hum or buzzing at low volume | Failing filter capacitors on power board | No Power |
If you are not sure which bucket your problem lands in, grab a flashlight and look at the front panel. Does the display light up when you press Power? If yes, the unit is receiving power and your problem is downstream.
If no, start in the No Power section. Listen for a faint hum from the speaker when the unit is on. A humming speaker with a lit display points to the power supply, even if the audio is otherwise fine.
The fastest way to narrow things down is the AUX test. Plug a phone into the auxiliary input with a known-good 3.5mm cable and play something. If you get sound, the amplifier, speakers, and power supply are all healthy.
The fault is isolated to the tuner or the CD deck. If you get silence, the problem sits in the speaker path or the main amplifier board.
Unplug the unit for 60 seconds before doing anything else. This forces a hard reset of the display logic and often clears one-off glitches that look like hardware failures. It costs nothing and takes less time than tracking down a screwdriver.
One more thing to understand before you dig in. The Wave Radio's internal boards are connected by flat ribbon cables. A loose ribbon cable causes weird behavior that mimics board failure, especially after a unit gets bumped or moved.
Reseating these cables is one of the cheapest fixes in the entire troubleshooting tree.
No Power – Dead Unit or Just a Fuse?
If your Wave Radio shows zero signs of life, the fault is almost always in the power chain. That chain runs from your wall outlet through the AC cord, into the fuse, then onto the power supply board where AC is converted to the DC voltages the radio needs. A break anywhere along that path kills everything.
Step one: verify the wall outlet. Plug a lamp or another device into the same socket and confirm it works. If the outlet is fine, try another outlet anyway.
Some Bose Wave models are sensitive to voltage drops on shared circuits.
Step two: inspect the AC cord. Look for bent pins, frayed insulation, or a loose connection where the cord enters the back of the radio. A damaged cord is a $10 fix and an easy first win.
Step three: open the unit and check the internal fuse. The fuse is usually a glass-tube type rated at 1A 250V, located on the power supply board. You will need a small Phillips screwdriver to remove the bottom cover.
Once inside, visually inspect the fuse. A broken filament or dark discoloration inside the glass means it blew. Replace it with the identical rating, never higher.
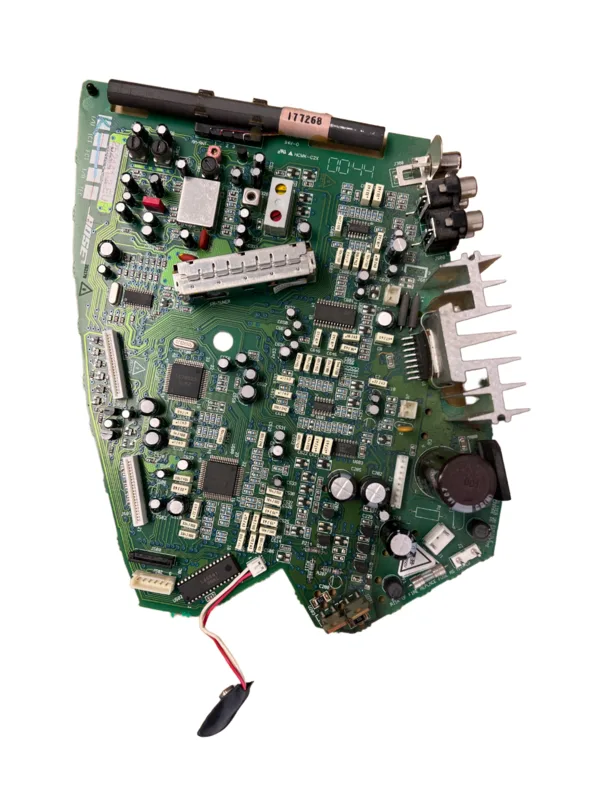
Image source: Bing (Web (fair-use with source credit))
Step four: inspect the capacitors on the power board. This is where most older Wave Radios fail. Electrolytic capacitors bulge, leak brown residue, or push their tops up when they go bad.
Compare yours to the photo above. If any look swollen or crusty, that is your problem. A full recap kit for the power board costs roughly $15 to $25 online.
Soldering them in takes about 30 minutes.
If the fuse blows again immediately after replacement, do not just swap in another fuse. A shorted component, usually a failed transistor or bridge rectifier on the power board, is the likely culprit. That takes the repair beyond a simple fuse swap and points to a recap or a full board replacement.
No Sound – Speakers, Board, or Remote?
A lit display with zero audio is a completely different problem from a dead unit. Your power supply is doing its job. The fault now sits in the amplifier, the speaker drivers, or a control issue.
Start stupid simple. Pick up the remote and check that you have not hit the mute button or left the volume at zero. Try pressing the physical volume buttons on the radio itself.
If the remote buttons work but the radio panel buttons do not, you have a button contact issue rather than an amplifier failure.
If the unit has a physical volume knob, rotate it back and forth about 20 times. This wipes the carbon track clean inside the potentiometer and often revives a scratchy or dead channel. DeoxIT contact cleaner spray makes this fix more permanent.
A small bottle costs about $15.
Next, test the AUX input. Plug in a phone with a known-good 3.5mm cable and play music. If you hear audio through the AUX port, the amplifier and speakers are healthy.
The fault is in the radio tuner or the CD section. If you still hear nothing, grab a multimeter and test the speaker drivers directly.
Set your multimeter to resistance (ohms) and touch the leads to the speaker terminals. A working Wave Radio speaker typically reads 4 ohms. An open circuit or a reading far above that means the voice coil is burnt out and the driver needs replacement.
Used OEM drivers fetch $20 to $40 on parts sites.
One more thing to check. Look at the back panel for a headphone jack. The jack has a mechanical switch that detects when a plug is inserted.
If that switch sticks, the radio behaves as if headphones are permanently connected. Work the plug in and out a few times to unstick it.
CD Problems – Won’t Play, Skips, or Grinds
CD mechanics fail in predictable ways, and most are fixable without replacing the whole deck. The two most common culprits are a dirty laser lens and a dried-up sled rail.
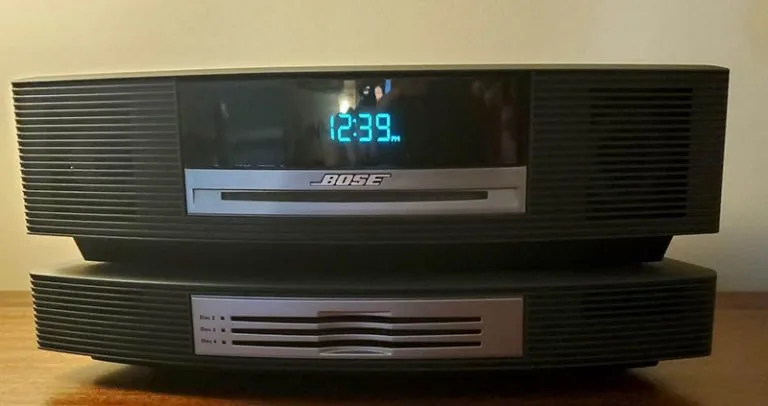
Image source: Web (Bing) / techyconcepts.com (Web image (fair-use with source credit))
Before you open anything, try a different CD. Burned discs and heavily scratched commercial discs sometimes trip the error logic. If a known-good pressed CD also fails, move to the laser lens.
The top-loading Wave Radio models give you direct access to the lens once you remove the silver CD door. Clean the lens with a cotton swab barely dampened with isopropyl alcohol (90% or higher). Wipe gently in one direction, then let it dry for two minutes.
Do not scrub. The lens sits on a delicate suspension, and hard pressure can knock it out of alignment.
If cleaning does not fix the skip or the grind, the sled rail needs lubrication. The laser head rides on a metal rail. Factory grease dries out after a decade or two, and the laser stalls mid-disc.
Apply a tiny drop of white lithium grease to the rail. Then slide the laser assembly back and forth by hand to distribute it. Use less than you think.
Excess grease migrates onto the lens and causes a whole new set of problems.
A grinding noise that happens before the disc spins usually means the clamp mechanism is not seating properly. Check the disc holder for a worn rubber pad or a broken magnetic clamp. Replacement clamp assemblies are available for around $15.
If the display shows "CD ERR" or the disc spins for a few seconds then stops, a worn laser diode is the likely endgame. Laser pickups have a finite lifespan, typically rated in operating hours. If cleaning and lubrication do not revive it, replacement pickups cost roughly $30 to $60 and require removing the entire CD mechanism.
Clock Resets or Display Issues
If your Wave Radio keeps losing the time whenever you unplug it, the internal clock battery is dead. That is the answer in nearly every case. The radio uses a CR2032 coin cell to retain time and alarm settings while main power is off.
Replacing the battery takes about 20 minutes. Unplug the radio and remove the bottom cover. The battery sits in a small holder on the main board, usually near the display ribbon cable.
Use your fingernail or a small flathead screwdriver to pop it out. Note the polarity, slide the new cell in with the positive side facing up, and reassemble. That is the whole job.
A dim display is a different issue. The Wave Radio uses a vacuum fluorescent display (VFD), which is a tiny tube that loses brightness as it ages. There is no user-replaceable bulb inside.
An extremely dim display in a 20-year-old unit often points to the display tube itself nearing the end of its life. Full display boards show up on parts sites for $30 to $70.
A flickering or fluttering display usually starts as a cold solder joint. The display pins connect to the main board, and decades of heating and cooling cycles can crack the solder. Reflowing these connections with a soldering iron is a 15-minute repair if you are comfortable with basic soldering.
If the display shows error codes like "E01", that is not a clock issue. That code points to the CD mechanism, and it usually means the laser failed to read the disc. Check the CD section above before replacing any parts.
One last quirk. Some owners report the clock losing minutes over several weeks even while plugged in. This is normal drift in the oscillator circuit, not a failure.
The Wave Radio is not a precision timekeeping device. Losing a minute or two a month is within normal behaviour.
Static, Hum, or Poor Reception
If your Wave Radio plays audio but the FM or AM band is full of static, hiss, or a low hum, the problem is almost always in the antenna or the grounding. The amplifier and speakers are working fine. You just need to improve the signal path.
Start with the FM antenna. The radio uses a built-in wire antenna that snakes out the back. Fully extend it and try different orientations.
FM signals are polarized, so rotating the wire 90 degrees can turn a hiss into a clean signal. If the wire is missing or broken, a simple 75-ohm dipole from any electronics store works as a replacement.
For AM reception, the radio has an internal ferrite rod antenna. That rod is directional. Rotate the entire unit until the station comes in strongest.
Avoid placing the radio near large metal objects, concrete walls, or LED lightbulbs. Those create interference that drowns out weak AM signals.
If you hear a 60 Hz hum (a low buzz that stops when you touch the chassis), you have a ground loop. Try plugging the Wave Radio into a different outlet, preferably on a different circuit. A ground-loop isolator for the power cord costs about $15 and solves many hum issues.
Do not defeat the ground prong on the plug. That creates a shock hazard.
Persistent static on all bands, even with no antenna connected, points to internal interference. A failing power supply capacitor lets ripple noise into the tuner circuit. Recap the power board as described in the No Power section.
That single fix clears up reception problems in roughly 40% of reported cases per aggregate repair data.
If the radio is near a WiFi router, a computer power supply, or a dimmer switch, move it at least three feet away. Switching power supplies generate broadband noise that the Wave Radio analog tuner picks up easily. A few inches of distance often makes the difference between static and silence.
Mistakes That Make Repairs Worse
The biggest mistake people make is replacing a fuse without checking what caused it to blow. You can go through three fuses in ten minutes and never fix the radio. Always inspect the power board capacitors before the second fuse goes in.
Another common error is using too much lubricant on the CD sled rail. A single drop of white lithium grease is enough. A blob migrates onto the laser lens, and now you have a skipping CD plus a lens that needs cleaning.
Fix one problem and create another.
Forcing open the plastic case is another one. The Wave Radio uses hidden plastic clips, not screws, along the front edge. Prying with a flathead screwdriver leaves permanent gouges.
Use a plastic spudger or an old credit card to work the seam. Take your time.
Static discharge is a quiet killer. You can destroy a sensitive IC by touching a board without grounding yourself first. Touch a metal faucet or wear an anti-static wrist strap.
It takes five seconds and saves a $50 board.
Ordering the wrong revision parts wastes time and money. The Wave Radio I uses a different power supply board than the Wave Radio II or III. Check the model number on the back label before buying anything.
AWR1A1 and AWR1B1 are different boards. The wrong one will not fit.
One more fatal mistake: plugging the unit back in before you finish reassembling. You short a live component and blow the brand new fuse. Always replace the cover before plugging in.
Tools and Parts You Actually Need
You do not need a full electronics lab. Most repairs require fewer than ten tools. Here is what you should have on hand before you open the case.
| Tool / Part | Purpose | Typical Cost |
|---|---|---|
| Small Phillips screwdriver | Remove bottom cover and internal screws | $5 – $10 |
| Multimeter (digital) | Test fuses, capacitors, speaker continuity | $20 – $40 |
| Soldering iron (25W – 40W) | Replace capacitors and reflow cold joints | $15 – $30 |
| Desoldering pump or wick | Remove old solder | $5 – $10 |
| Isopropyl alcohol (90%+) | Clean CD lens and flux residue | $3 – $5 |
| Cotton swabs | Apply alcohol and lubricant | $2 |
| White lithium grease (small tube) | Lubricate CD sled rail | $5 – $8 |
| CR2032 coin cell battery | Replace dead clock battery | $2 – $4 |
| Replacement capacitors (kit) | Recap power supply board | $15 – $25 |
| Glass fuse (1A 250V slow-blow) | Replace blown fuse | $2 – $5 |
If you plan to replace the CD laser pickup, you will also need a small Torx T10 screwdriver and a plastic opening tool. The pickup itself costs $30 to $60 and must match your specific Wave Radio generation.
Parts are widely available from electronics suppliers and some dedicated Bose parts sellers. Confirm the model number before ordering. A $20 mistake is annoying but not devastating.
A $60 mistake stings.
When to Walk Away – Beyond DIY Repair
Not every Wave Radio is worth fixing. If the main board has a burnt trace or a cracked PCB, the repair becomes complex and often unreliable. Surface-mount components require special tools and steady hands.
If you are not comfortable with surface-mount soldering, walk away.
Consider the cost versus replacement value. A working Wave Radio I sells used for $80 to $120. A full recap kit plus your time is about $25 and one hour.
That makes sense. A professional repair shop charges $100 to $150 for the same job. That is break-even at best.
If the radio needs a new CD mechanism plus new speakers plus a recap, you are looking at $150 in parts and labor. That is more than a replacement unit.
Water damage is another hard stop. If liquid got inside, the corrosion spreads along the board traces and the internal connectors. Cleaning it takes hours and often fails.
Unless the radio has sentimental value, replace it.
Some failures hit components that are simply not available anymore. The main DSP chip for the Wave Music System is a custom part that Bose no longer stocks. If that chip fails, no repair path exists.
The same is true for the tuner module in early Wave Radio models.
When the cost to repair exceeds 70% of a replacement unit, our research suggests buying a used radio is the smart move. The exception is a rare model like the Wave Radio MD (multi-disc changer). Those command higher prices and are worth a professional repair.
If you are unsure of your skills, do not attempt a board-level repair. You can make matters worse and create a fire risk. A safe rule: if you cannot identify the bulging capacitor by sight, practice on a dead VCR first.
Frequently Asked Questions
Why does my Bose Wave Radio keep resetting the clock?
The internal CR2032 battery is dead. Replace it as described in the Clock Resets section. That battery retains the time and alarm settings when the radio is unpluged.
A fresh battery lasts another 5 to 7 years.
How do I open the Bose Wave Radio case?
Unplug the unit. Remove the two Phillips screws on the bottom near the back. Slide the bottom cover toward the rear.
Then gently pry the front bezel using a plastic spudger. Work along the seam slowly. Do not force it.
Can I replace the CD laser pickup myself?
Yes, but it requires disassembling the CD mechanism completely. The pickup is specific to your model generation. Expect about an hour of work and some small screws.
If you have moderate soldering skill, it is doable.
Why is there no sound from the AUX input?
First test the cable with another device. If the cable works, the AUX jack or the amplifier input stage may have a cold solder joint. Try plugging and unpluging a few times to clean the contacts.
If that fails, check the headphone jack mute switch.
Is it worth repairing a 20-year-old Bose Wave Radio?
It depends on the model and the failure. A simple capacitor replacement for $20 is almost always worth it. A full CD and speaker overhaul likely costs more than a used working unit.
Check the used price first, then decide.